How to build a grow room
Home Page
Growing weed
Your photos
How to make hash
Say no to soap
How to build a grow room
How To Grow Hydroponic Marijuana
The green room blog + links
Was Jesus a Stoner?
Guest Book
Marijuana strain guide
How to survive encounters with the cops
Garden Security Tips
step 1
Step 1: Get the seeds and germinate them
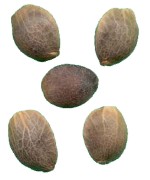
The easiest way to get the seeds is from a friend. Look for seeds that are dark brown or light gray. Some may have dark lines inset into these colors, like tiger stripes. White, small seeds are immature and should not be planted. If you want high quality seeds click the banner bellow..
Handle the seeds as less as possible. Drop them in a glass filled about halfway with room temperature bottled water (tap water contains alkaline and other chemicals harmful to fragile sprouts). Typically, bad seeds sink and good ones float, but there are exceptions, so don’t eliminate any seed right away. Put the cupful of seeds in a dark closet. Soaking them will soften the hull and promote germination. Within three days, the hulls will crack and a tiny white root tip will emerge. When the tip grows to about a half-inch, it’s ready to be planted.

step 2
Step 2: Planting the seeds
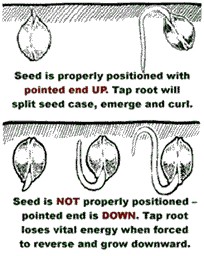
Plant the seeds in a small pot with straight, non-fertilized planting soil. Just fill the pot with soil and pack it down slightly. Poke a hole in the center with a pencil and plant one seed sprout (or seed) in each pot. The seed should be placed with the POINTED END UP at a depth of 1/2 to 3/4 inch. Transplanting them into the pods must be accomplished without damaging the fragile tip or disturbing the hull. Handle the seeds gently with sterilized tweezers. Make sure not to pack the peat too tightly against the sprouts. Now your seedlings are ready for the grow room. Use the best soil you can get. You can find excellent soil for sale at your local plant shop. The containers should be sterilized, especially if they have been used previously for growing other plants.
Plant the seeds in a small pot with straight, non-fertilized planting soil. Just fill the pot with soil and pack it down slightly. Poke a hole in the center with a pencil and plant one seed sprout (or seed) in each pot. The seed should be placed with the POINTED END UP at a depth of 1/2 to 3/4 inch. Transplanting them into the pods must be accomplished without damaging the fragile tip or disturbing the hull. Handle the seeds gently with sterilized tweezers. Make sure not to pack the peat too tightly against the sprouts. Now your seedlings are ready for the grow room. Use the best soil you can get. You can find excellent soil for sale at your local plant shop. The containers should be sterilized, especially if they have been used previously for growing other plants.
step 3
Step 3: Installing the lights
Incandescent lights are horribly inefficient and really not an acceptable option for plant growth. Although they are inexpensive to purchase, their cost of operation makes them the costliest source of light.
Fluorescent tubes are for those growing in enclosed and notespecially-well-ventilated spaces. They emit about three times as much light as an incandescent (given the same wattage), and the light spectrum is one that plants can use more effectively. Light is emitted over a large area, so it is not concentrated. Because of this, the lights have to be hung very close to the plants (usually within 2 inches or so from the growth tips). Their light intensity is low and don’t produce great buds at flowering. Florescents are very useful in cloning and starting seedlings. They also put out a more gentle light than the HID lamps and release far less heat. The fact that they produce less heat is very important If you can afford no heat build-up at all. When using florescents, it is best to purchase the 40-watt “cool white” variety.
High Intensity Discharge lamps are the best solution for most indoor growers. HID lamps come in 3 basic flavors: High Pressure Sodium (HPS), Metal Halide (MH) and Mercury Vapor. HPS lamps are the best choice and can be used to grow a crop from start to finish. Gardens should receive 1,000-3,000 lumens per square foot. Successful gardens usually are lit at around 2,000 lumens per square foot. A 400 W HPS provides approximated 50k lumens, which is efficient for 25sq feet. When using HID lamps ventilation is essential, because the lamps emit a lot of heat.
Step 6: Get rid of the males
Marijuana Grow Guide
Males are unwanted because of their unusable flowers and because they will pollinate the females. After the fourth week of vegetative growth from seed preflowers will strat to form. Check carefully above the fourth node and use a magnifying glass to look at the early flowers sex type. A male plant will have a small club (playing card) looking preflower with a small stem under it. A female flower is usually a single or double pistil, white and wispy, emerging from an immature calyx. For the flowering state keep the lights on for 12h. Make sure the plants stay at least 18 inches from the light, unless you’re forced to use florescent light to flower, in which case they should be an inch or two from the growing tops. Flowering state takes about two months. As the weeks go by, the flowers will swell with resin and give off a delightfully sweet, pungent fragrance.Your goal is to time your harvest to ensure optimum resin levels. The easiest way to track the aging of your plant is to observe the pistils and the resin. Pistils start off white and begin turning reddish brown or orange late into flowering. Resin goes from clear to amber. This is the time to harvest the plants.
Step 4: Installing the ventilation
You can probably get away with just a fan as long as the temperature doesn’t get too hot, meaning 85-to-90 or above. I also recommend a system that can both bring in fresh and exhaust hot, stale air. You can rig a cheap efficient system using a small blower fan connected to clothes-dryer venting tubes, the intake capped with an air-conditioner filter. In the Flower Room, it is especially important to get fresh air exchange. Plants breathe through their leaves. They also rid themselves of poisons through their leaves. If proper ventilation is not maintained, the pores of the leaves will become clogged and the leaves will die.
Step 7: Harvesting and curing
Cut down your plants at the base of the stalk. Remove all extraneous leaves from the branches so that only the flowers remain. Trim those big leaves and pointy leaf tips from the long main cola? When you’re finished trimming, hang the plants upside down in a room with low light or darkness. Humidity should be 40-60% and maintain adequate ventilation. Depending on how well you control humidity, it will take 3-to-15 days before the flowers are dried out and ready to be smoked. In the meantime, put a few flowers in your oven overnight with just the pilot light on or in a crock pot set on high. By morning, they should be ready to sample. Because you used a fast-curing process, the smoke may be harsh.
After drying, any variety benefits from a slow cure. After the harvest is dry enough to create a snapping sound when stems are bent, the material is placed in sealed glass containers. The jars should be opened and aired out once or twice every 24 hours. If you smoke a bud as soon as it is dry, it is nothing like it becomes after a nice slow dry and cure. The buds must remain dry with no moisture from inner stems still dispersing, kept out of direct light and the ambient temperature/humidity should be comfortable for humans. After 3-5 weeks put the vacuum sealed containers in a fridge. No bud should be smoked before its time.
Step 5: Going through the vegetative state
For the first 2 weeks keep the lights on 24 hours a day. The newly hatched seeds need the long daylight. Keep the pods moist to wet and make very sure not to let them dry out. After one to two weeks, the plants will develop a good root ball. Then transplant them into the 2-gallon pots and set them under 18 hours light.
After transplanting your plants into the 2-gallon pots, it’s critical to water thoroughly and then allow the root ball to dry out completely, down to the very bottom of the container, before watering again. I repeat, do not over-water. This is the most common mistake indoor gardeners make. Fortunately, modern technology has come to our rescue with the Moisture Meter. Think of it as insurance for 12 bucks. Let the water stand for a day or two before watering. The water will come to room temperature during that period of time and you can avoid the nasty shock your plants suffer when you drench them with cold water. Chlorine will evaporate if you let the water stand for 24 hours in an open container.
Plants can be grown vegetatively indefinitely. It is up to the gardener to decide when to force the plant to flower. A plant can grow from 12" to 12' before being forced to flower.